How to Integrate WooCommerce with Square Payment Gateway?
Payment gateway is a must-have aspect of any WooCommerce store. Customers can pay using a variety of methods, including credit cards, bank transfers, and even crypto. Payment gateways, such as the well-known Square Payments for Woocommerce, are adapting to the various needs and requirements of WordPress websites.
This article will show you how to integrate the Square payment gateway and how to use the WP Easy Pay plugin. It’s a free plugin that lets you use Square as a payment gateway on your WordPress website. If you have an e-commerce store, it is the best choice so far.
What Is Square Payment Gateway, And How Does It Work?
SquareUp is designed to be an omnichannel system with e-commerce capabilities. Based in San Francisco, Square is a recognized merchant service and mobile payment gateway, provider. Square Register and Square Reader are among the company’s best financial software and hardware offerings. Square is user-friendly enough for everyone to use and powerful enough for engineers or huge organizations to benefit from it. Square Payment Gateway is an excellent choice for businesses and individuals who need to receive credit card payments via Android and iOS apps.
You can use Square Payment Gateway with WordPress, WooCommerce, Gravity Forms, Ninja Forms, Caldera Forms, and LearnDash, among other platforms. It was never offered as a separate WordPress plugin, though. On the other hand, Square provides a simple and profitable way to accept payments on WordPress-driven websites.
Square’s features comprise the facility to receive all major debit or credit cards and different payment methods
Square accepts all MasterCard, Visa, American Express, and UnionPay cards issued in the United States and other global magstripe and chip-based cards.
It enables you to receive payments from your customer’s card and pay with other methods like Google Pay or Apple Pay, and more.
Accept-Online Payments
A stripe-powered e-commerce store can easily build and integrate Square Online Checkout and receive online orders and payments. Customers can pay their charges by manually entering card credentials through an online application or desktop.
Point of Sale
For your retail store solutions, Square also offers a POS (Point of Sale) system. Card readers and a barcode scanner are embedded with the Square’s exclusive setup.
What is WP Easy Pay?
The WP Easy Pay plugin has many useful features to suit your needs. Download WP Easy Pay and start receiving online card payments with a reliable and globally trusted Square Payment Gateway for your WordPress site.
The Square payment gateway uses shortcodes to create dynamic buttons that enable payment forms on your WordPress site. Accepting simple payments, charities, memberships, and recurring payments through seamless integration of WP Easy Pay. To keep your business running smoothly, meet your one-time payment requirements.
In addition, the admin panel enables you to manage SQUARE TRANSACTION NOTES, EMAIL NOTIFICATIONS, and REPORTS without difficulty.
WP Easy Pay has been updated to include many new functionalities, including the ability to award coupons, charge additional charges in the payment form, and display a new subscriptions console on the front end for users to keep track of their memberships and other plugin activity.
WP Easy Pay has the following features:
- Create a one-time and regular payment schedule
- Payments without the need for an API code
- All payments can be made with a single button
- Email notification upon successful transaction.
- Developers can test in a SANDBOX environment
Square card payments are accessible in few regions like Canada, United States, United Kingdom, Australia, and Japan. Let’s look at how to set up WP Easy Pay as a WordPress payment gateway and start collecting credit card payments online on your website.
Requirements for WP Easy Pay
- Valid SSL certificates
- A valid Square account
- WordPress 4.8 version or more
- PHP version 5.5 or more
- Free Version of WP Easy Pay
WP Easy Pay is a free plugin, meaning that users may choose to use the free features or pay for premium features.
You can only make one button in the free version. You can choose from a variety of payment choices in the premium version, including memberships, payment pop-ups, one-time payments, and more.
WP Easy Pay – Square Configuration
WP EasyPay offers both a FREE and a PAID version, depending on the features and facilities available.
For a better tutorial, we’ll use the PREMIUM version to set up the plugin. Go with the following steps below to get started:
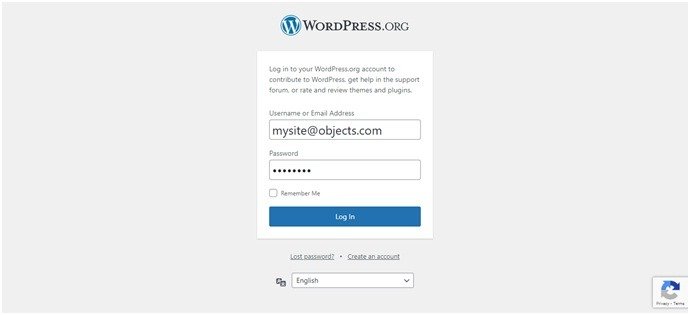
Log in to your WordPress dashboard with your username and password.
When you’re in the dashboard, navigate to Plugins and hit the Add New option, then search for WP Easy Pay – With Square in the upper right corner’s search box.

Select the Install Now option. When you install the plugin for the first time, a screen will show.
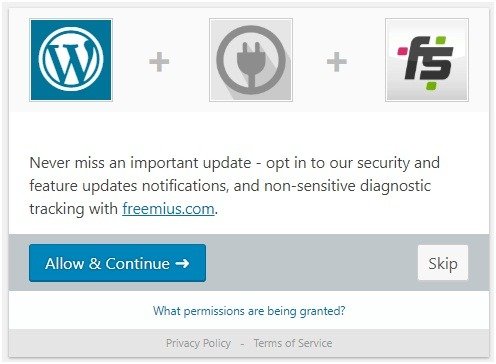
To continue, all you have to do is click the Allow & Continue option.
After then, check your inbox to see if an email from WP Easy Pay has arrived. For more setup, click the Activate button.
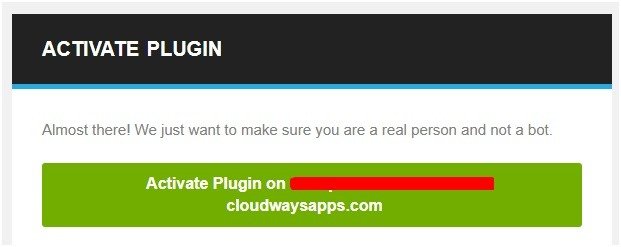
Find WP Easy Pay (Premium) in your Plugins folder and click the Activate button. It will take you to the following page, as shown in the screenshot:
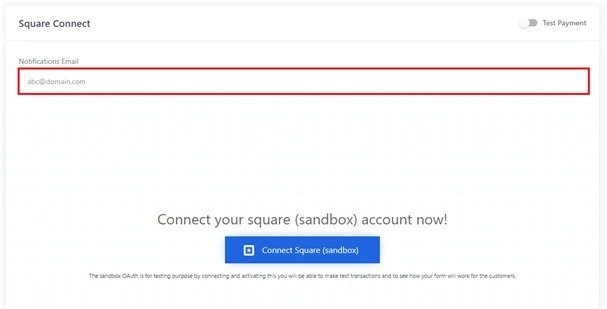
If your payment process is live, enter your email address and turn the Live Payment toggle right.
You must first visit www.squareup.com and sign in to your Square registered account using your authorizations. To proceed, click the [Connect Square] button once you’ve successfully logged in.
When you click to connect, you’ll be asked whether you want to make a Live Payment or a Test Payment. You can make your selection based on your needs. We’ll be working on a test payment in this tutorial.
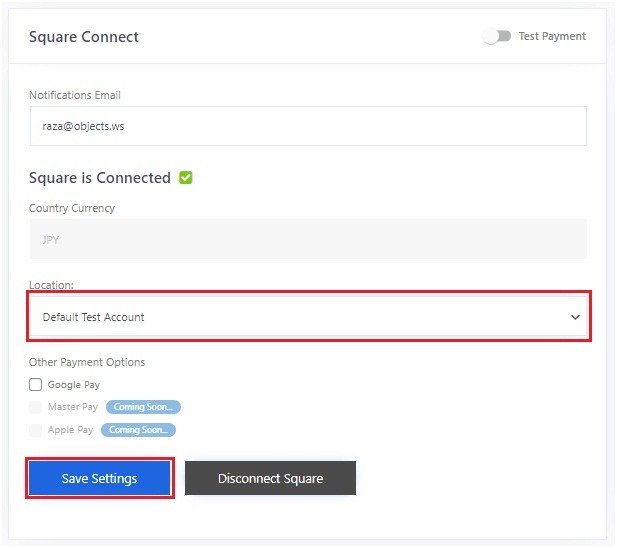
Here, you must first choose your existing location before clicking the Save Settings button.
Navigate to WP EASY PAY, click Create Payment Form click Settings after that.
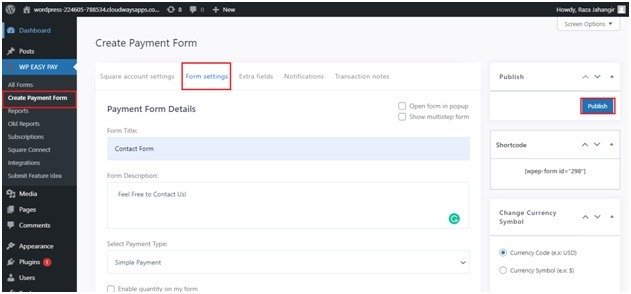
This section contains the form details; provide each detail according to your form’s requirements. Each field will be defined as bulleted below for the benefit of the readers:
- Form Title — Give your form a name; in this case, I’m called a Contact Form.
- Form Description – Enter information about your form or the message you wish to send to your users in the field.
- Choose a payment method: From the drop-down menu, choose your preferred payment method.
- Amount Type: From the drop-down box, choose the payment layout design you want to show.
- Make your payment packages; I’ve only made two thus far.
- To save the user’s card for future use, check the Enable save the card for future use cases.
- Select Yes from the drop-down choice for the redirection procedure, set the time for the redirection process, label your redirection button, and enter the redirection URL.
- Payment Success Notification — Customize your payment success notification for a successful transaction.
- Postal Placeholder – Fill in the blanks with the postal placeholder’s information.
- If you want your users to accept your Terms and Conditions, check the Enable terms and conditions on my form box and add a link label and link to page details.
To save your changes, click the Publish button after you’ve entered your information. Then, for even more flexibility, head to the Extra fields section.
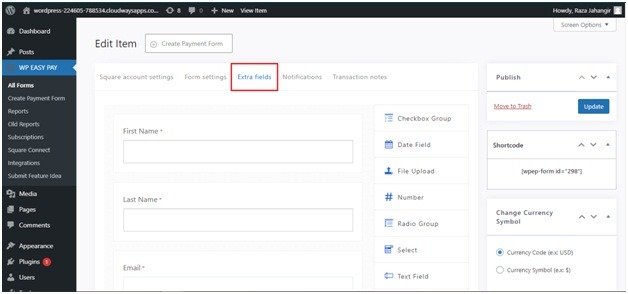
You may create your form in this area by selecting from the choices below.
- Group of checkboxes
- Field for Dates
- Upload a file
- Number
- Radio
- Select
- Text field
- Contact
- URL
- Area for Text
Then, to make modifications, click the Publish button. Then proceed to the following phase, which is Notifications.

You have two choices here:
Admin Email Template – You can modify the Admin’s email template using this option.
User Email Template – This option allows you to change the email templates for individual users.
At last,
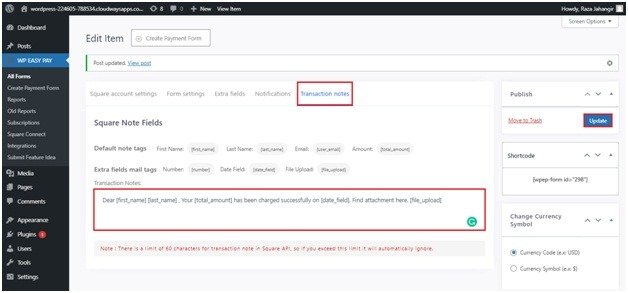
Tags can be used to personalize your transaction notes, and then you can save your modifications by clicking the Update button.
To display your form, create a new page and copy the shortcode from your form and paste it into it, as seen in the screenshot below:
Choose your form from the drop-down menu and enter your Page Title. Then, to publish your form, click the Update button.

The results of your form will be shown. To complete your transaction, enter your information and click the Pay button.
Conclusion
By combining the Square payment gateway with WooCommerce, website owners can accept payments with little setup. Users who want to receive payments without investing a lot of money can utilize the free version. A premium edition offers extra features and settings for users who want to access advanced features according to their business complexities.
On the other hand, Stripe is the best option for those looking for a more customized checkout procedure. If you manage a high-volume e-commerce store, it is essential to integrate a powerful gateway to cater to your customer needs. Each feature you can get can grow your business, strengthen your client’s trust, and boost your sales. This means a worldwide engagement, 24/7 support, and easily integrating the Stripe payment gateway into the WooCommerce platform.
-
 10 Result-Driven Advertising Ideas for Your Small Business
-
 Why Magento is the Perfect Choice for eCommerce Store Development?
-
 Social Commerce Explosion: How to Sell Directly on Social Media
-
 Best SEO Strategies for eCommerce: Boost Visibility and Sales
-
 Reasons Why Quantity Isn’t Important While Backlinking to Your Site?
About Author
Micky Joseph
Micky is a passionate blogger, who writes enriching posts on web design, web development and technology news. He loves writing about web development, tips, tools, tutorials, cloud, hosting, domain, and also sharing knowledge about latest technology news. He also writes about cms, programming language and various software. Follow us on FlipBoard.