Creating a News App Using React Native Framework
To stay informed about the events occurring a ll across the globe, you rely on news apps. Right? Let’s learn about the steps of creating a user-friendly and efficient NEWs app with React Native framework. If you are already familiar with the benefits of React Native framework, you must have understood how choosing this cross-platform app development framework can be profitable for your React Native app development company.
Without wasting time, let’s get started.
Prerequisite criteria: How to get started?
Here, we will discuss the prior-needed tasks that you have to complete before starting with the codebase.
As the first task, you need to set up the environment. Here, you have to install React Native CLI, Node.js, VS Code editor, and Android Studio. This will let you build your project with the help of CLI tools. Note that we will be using the React Native CLI tool and not the Expo CLI tool. Also, you have to get other SDKs. However, if you have already used React Native in your previous project, you must have this setup already done, then you can skip to the second step. In case you have no idea, you can check the entire process from the attached article.
As the second step, you have to set up or create the template. It is a basic template that will have the App.js file and other basic folders used in every RN project. For building this template, you need to run the cmd from a local folder and pass the command: npx react-native init NewsApp –version 0.68. This will immediately build the template with the name ‘NewsApp’. Look at version 0.68.1 of React Native we are using. The choice of the version will be based on project requirements. However, I would suggest you use the 0.68.1 version every time you build a React Native project.
Thirdly, you have to get the third-party library: Axios. It will be used in the current project to execute the GET request and fetch data through the API call.
To install this package, you have to run npm i axios. to pass this command in your app terminal.
Besides performing the GET request, it protects user data from misuse and breach. Since we have used the 0.68.1 version of RN, we don’t have to perform manual linking of the package with this system, it will be automatically linked to your project.
In the last step, you have to select the source from where you can get updates on current news. It will require generating a News-based API key. Also, you have to add this API key to your codebase. So, you have to create this API key from the linked site. Register on this site by providing your credentials. It is the most important step as the API key acts as the source of the news. After rendering or executing the program, News from the considered web server will be displayed on the screen.
And you have completed the beginning phase of this product. Now the main coding segment is left.
Building the .js file for the News App
Here, you need to add a codebase in two different files namely the NewsRender.js file and the App.js file. First, we have to create the NewsRender.js file. So, let’s get started.
NewsRender.js file

Image 1
Here are the components that we need in this NewsRender.js file. Also, there are two hooks of React Native that you will need to introduce and update the state of state variables along with running a function when a change in variable occurs.
So, the components and hooks are StyleSheet, Image, Text, ScrollView, View, Dimensions, useState, useEffect, and Rect. However, Axios is the third-party library that you have separately installed.

Image 2
The code syntax in image 2 introduces a component NewsRender. It specifies the width of the app using the Dimensions components. This means that the width of the app will take the width of the entire device window.
In the last two lines, it adds the two state variables dataWidth and getData. The initial value of the two state variables is set using the useState() hook. Also, the second element in the array (setDataWidth and setGetData) are used to update changes in the state of the dataWidth and getData respectively.

Image 3
The API key that you have generated in the beginning will be used here, in this step.
useEffect is used to specify the width of the data under applied conditions. If the width<500, then it takes the data width as the value obtained by dividing the width of the page by 1.1. On the other hand, if the width is>500 and <800, it takes the data width as the value obtained by dividing the page width by 3 and subtracting it from 20.
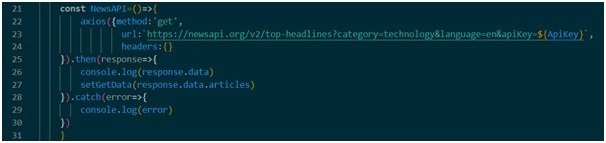
Image 4
In this section, the console.log() function is considered. It is the way to log some messages in the console. You can log or print errors or the data obtained from the server.

Image 5
The snippets shown in image 5 mention what elements are rendered on the screen. You can notice some text elements, an image element, and a view element. It renders all the elements under the Scrollview component.

Image 6
It is the styling segment. However, you have to start this section after exporting the App component.
As per the project requirements, we have considered the styling objects such as Text_News, data_type, title_name, dec_text, and text_name.
App.js file
This is going to be a simple process. It comprises a few lines of coding and you will be done creating the entire News app.

Image 7
No need to create a different file for App.js. You will find this file in your template. The only thing that you have to add is import the NewsRender component from the NewsRender.js file and add the component under the App view.
Steps to run the app on the emulator
For this, you need to go to the command prompt and type cd NewsApp. If you have saved the template with another name, then you need to substitute the ‘NewsApp’ with the name you saved the template.
Type npm install and then npx react-native run-android. It will activate the emulator and also the News App. Consider image 8 for the output.

Image 8
So, here is the entire process to create and run the app on a device (virtual).


About Author
Micky Joseph
Micky is a passionate blogger, who writes enriching posts on web design, web development and technology news. He loves writing about web development, tips, tools, tutorials, cloud, hosting, domain, and also sharing knowledge about latest technology news. He also writes about cms, programming language and various software. Follow us on FlipBoard.