How to Submit an App to The Google Play Store?
Google Play Store is the biggest and the primary source for Android users to get their desired apps downloaded, and having promising app features can help your app get more downloads. If you think you have a great app with promising features, we would suggest you upload it now to the Google Play Store, to get it downloaded and used by millions of people all across the world. This blog post is basically a step by step guide that will help you in submitting your app to the Google Play Store.
What Are the Prerequisites?
Before delving into the sea of Google Play Store directly, we would suggest you run through the below-mentioned checklist of prerequisites.
- You have a fully developed, tested, functional app, available to be launched commercially.
- Your app has a unique Bundle ID, which is going to represent it.
- You have got a signed release for your app, which is basically a signing certificate.
- You have got APL extensions if your app is too big in size. APK extensions are meant to break your app into parts so that it can be easily uploaded to the Playstore. (Maximum size for a single APK on Google Play Store is 100MB).
- You are signed up to Google Play Consoles and be a Play Publisher.
If you have successfully met all these fundamental requirements that it is the right time to submit your app to the Google Play Store.
5 Steps to Upload Your App to Google Play Store
- Get All Your App Information Sorted & Ready
Firstly, you need to log into your Google Play Console using your Play Publisher’s account. In order to create a new Mobile application, select ‘All Applications’ from the main menu bar on the left, and then click on ‘Create Application’ to begin the process. Enter your desired title for your application (50 characters) and select your app’s preferred language. Now click on ‘Create’. The picture below shows all the information that you need to enter your app.
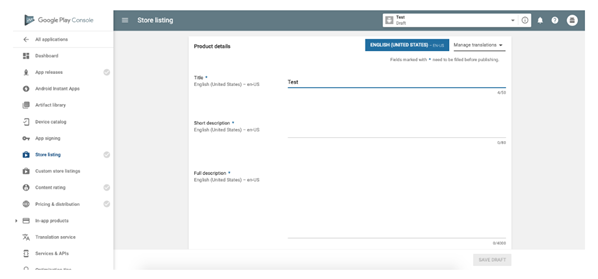
- Short Description: In this section, add a brief summary of your application. This part is very crucial and you need to fill it very thoughtfully because this is going to be displayed in your Google Play Store Listing and will play a crucial role in convincing people about downloading your app. We would recommend packing it with the best features and the most exciting information about your app in almost 2 to 3 lines.
- Full Description: In this section, you can add more details about your app and your character limit here is 4000. In this area, you can mention and highlight all the key features and benefits of your app. This section will show up when your user will open up the store listing of your app.
- Screenshots: In this section, add screenshots of your app to show how your app will show up in action. You should upload at least 2 to a maximum of 8 screenshots for the best results. If you have designed your app for a 7” or 10” devices, then upload the screenshots of your running on any similar device.
- Hi-res Icon: Select and upload the icon that is going to show on Google Play Store and on your users’ device as well when your app will be downloaded.
- Feature Graphics: Even though it is essential, it is labeled optional, because your app will not be listed anywhere on Google Play Store if you don’t add a feature graphics. We would suggest you go for a vivid, bold yet simple graphic/image that is attractive enough to promote your brand.
- Video Link: This section allows you to add a video link to your app. This could be a YouTube link as well where you can show complete functionalities and description of your app.
- Application Types: Specify here, if your app is a game or not.
- Category: Specify categories such as travel, education, business, etc.
Make sure that all this information is sorted and correctly filled and nothing is missed. Now click on ‘Save Draft’ to save all of the app info that you have just filled and then move on to the next step.
- Upload App Bundles Files or APK for Your App
Once it is certain that you have completed all the perquisites that are required for your app release on the Google Play Store, you are now supposed to upload files. In order to get this done, go to the ‘App Release’ options from the main menu on the left. Here you will get the options for the types of release. Alpha and Beta releases are the options that provide you the opportunity to test your app while checking their demand and viability. In return to Alpha and Beta releases, you tend to get valuable insights and feedback to improvise your app before its final release. ‘Production’ is the final app release, which allows you to submit the live version of your fully functional app to the Google Play Store.

As soon as you will select your desired release type, you will be redirected to the next page where you need to select on ‘Create Release’ in order to move to the ’New release to production’ page, from where you can make further selections.

At this page, you need to;
- Choose whether you want your app to use Google Play Sign-In or OPT-OUT in order to locally sign in.
- Now click on ‘Browse Files’.
- Choose your App Bundle or app’s APK that you want to upload.
- Now click on ‘Review’ at the right bottom of the page to confirm and submit the release information of your app.
Next is to set your app’s content rating, distribution, and pricing plan.
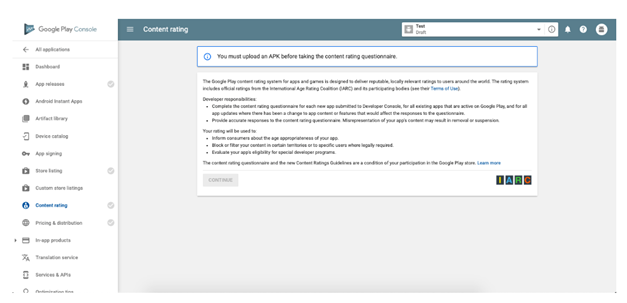
- Set Content Rating for Your App
To set content raring for your app, you need to the ‘Content Rating’ page selected from the left side main menu and then follow these steps.
- Click on ‘Continue’.
- Enter your email and retype to confirm it.
- Select the appropriate app category from the options and then start completing the survey form for your app’s rating. This will Google identifying any kind of explicit content, if present in your app.
- Now click on ‘Save Questionnaire’ and then click on ‘Calculate Rating’. This will show you the rating of your app on the Google Play Store.
- Click on ‘Apply Rating’ to confirm the content rating of your app.
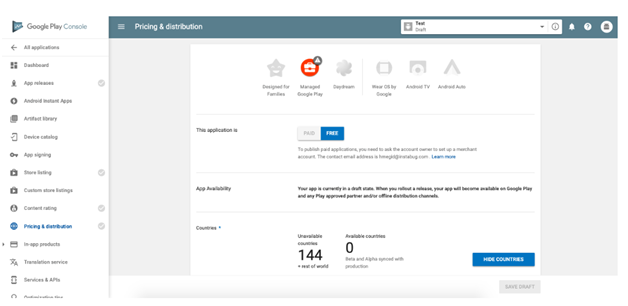
- Set Distribution Plan & Pricing for Your App
If you want your users to pay for the app that you need to decide on its pricing as well. Also, you need to decide on countries in which you want your application to be released or to choose if the app release will be made global. Go to the ‘Pricing and Distribution’ page from the main menu on the left.
- Select if you want your app to be ‘Paid’ or ‘Free’.
- Now select ‘Available’ for the locations/countries where you want your app to be released. Likewise, select ‘Unavailable’ for countries where you don’t want your app to be released.
- Select ‘Yes’ for the ‘Primary Child Detected’ if your app is suitable to children aged under 13, else click on ‘No’.
- Check ‘Yes’ for ‘Contains Ads’ if your app will have them, else choose ‘No’.
- Publish Your App
After completing all these steps, your app is now ready to be published commercially on the Google Play Store. Now go back to the ‘App Releases’ option from the main menu on the left, and follow these steps.
- Select ‘Manage Production’ for final release and Alpha or Beta Release if it’s not the finalized version.
- Select ‘Edit Release’.
- Now click on ‘Review’ at the right bottom of the page.
- Select ‘Start Rollout to Production’ for the final release.
- Finally, click on ‘Confirm’ when ready.
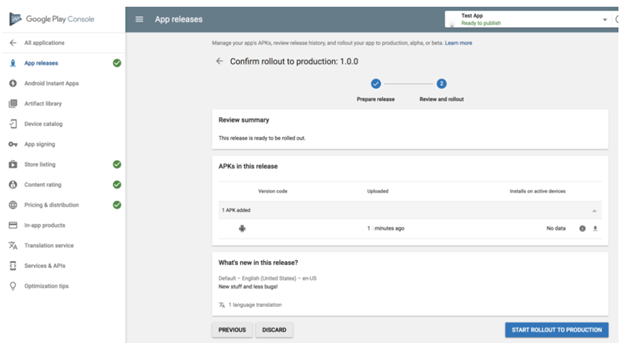
Your app is now submitted to Google Play Store and it will now send all the feedback and information to Google for review. Google publish your app within 2 hours within the countries you choose.
-
 React Native: Modern Day App Development Framework For Building Cross Platform Applications
-
 3 Insightly alternatives Comparison with Other Competitors
-
 5 Best Open Source Social Networking Applications
-
 Top 10 Project Management Software Tools in 2025
-
 Efficiency on the Go: Top 10 Productivity Apps for Digital Nomads
About Author
Micky Joseph
Micky is a passionate blogger, who writes enriching posts on web design, web development and technology news. He loves writing about web development, tips, tools, tutorials, cloud, hosting, domain, and also sharing knowledge about latest technology news. He also writes about cms, programming language and various software. Follow us on FlipBoard.